Sirsasana! The mighty headstand! It was one of those poses that I really really really wanted to do when I first started doing yoga. Standing on your head just looked so cool and so playful. It took me a while to get into a headstand for the first time but when I did, let’s just say there was happy dancing involved. To this day it remains one of my favourite yoga poses to practice.
Anyway, if you’re working on getting yourself upside down then here’s a little flow to help you get there.
Just to note, this is in no way a full yoga practice and I absolutely recommend warming up beforehand and then slotting this in about mid-way through your practice when you’re nice and warm but your muscles aren’t feeling too tired.
If you can’t quite make it all the way through to the end this time then just save it and return to it, build up to it. This little flow will help you create the strength and flexibility to get you up, so even if you just do the first few poses for now you’ll be able to work up to it as long as you stick with it.
Right, without further ado…
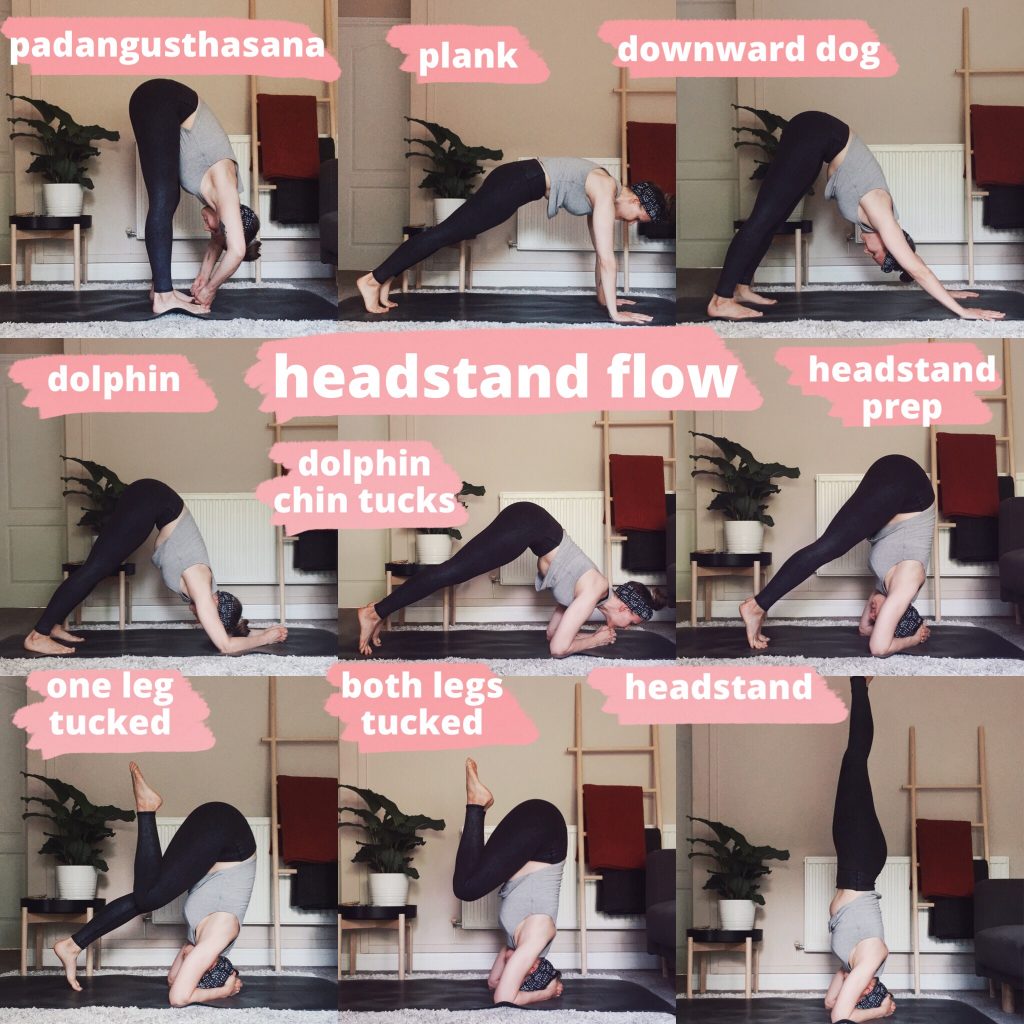
1. Padangusthasana
Or Big Toe Pose. In order to get ourselves into a headstand we need to create plenty of length in the hamstrings. Getting those hamstrings nice and long will make it so much easier for us to get our hips high enough to be able to float the toes off the mat.
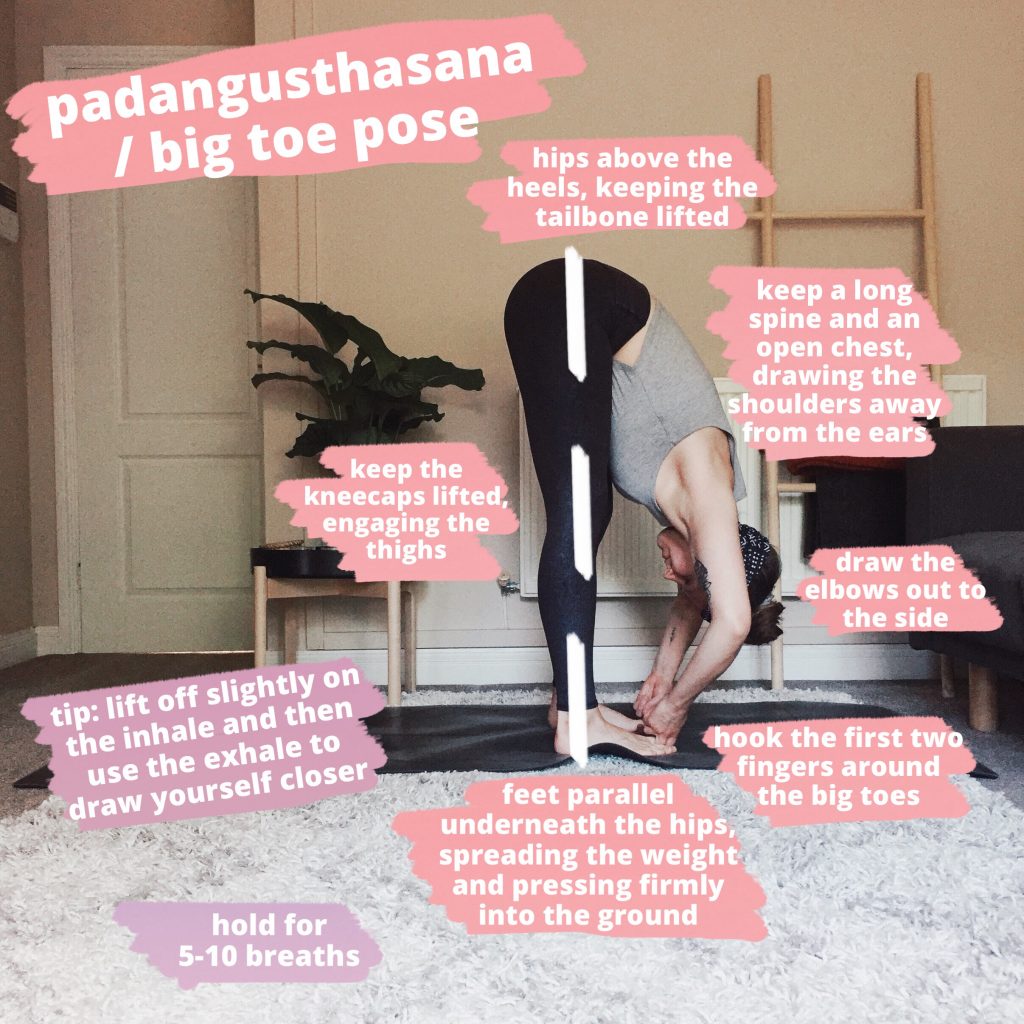
How to: Keeping the feet parallel underneath the shoulders, keep the spine nice and long as you fold over, hooking the first two fingers around the big toes. On the inhale create length in the spine and on the exhale draw yourself a little bit closer. Make sure you’re drawing the shoulders away from the ears and stacking the hips above the heels.
2. Plank
The ‘I love you but I also kinda hate you’ pose, but really there should just be love because this pose has all kinds of benefits. It’s an incredible full body strengthener and it really gets deep into the core and shoulders, especially when you do this dome-back variation.

How to: Stack the shoulders above the hands, lifting the space between the shoulderblades creating a slight rounding in the upper back. Draw the navel in to engage the core and keep the thighs and glutes engaged. Make sure you also keep it light on the toes, carrying the majority of the weight in the front body.
3. Adho Mukha Svanasana
Or Downward-Facing Dog. A classic to say the least. It targets the hamstrings and the whole of the backline of the body, it also strengthens the shoulders and legs.

How to: Keeping the hands shoulder width apart, spreading the fingers wide and grounding down through the hands (focusing on the knuckle of the index finger). Lifting the tailbone, pointing it to the sky and pressing the hips back. Draw the bellybutton in to engage the core and tuck the ribs slightly to spread the shoulder blades wide. Drawing the heels towards the mat and lift the kneecaps to engage the thighs.
4. Ardha Pincha Mayurasana
Or Dolphin Pose. This one is great to build up strength for both headstands and forearm stands. It targets the core, the arms and the shoulders whilst still also providing opening in the chest.

How to: Keeping the elbows shoulder width apart, cupping one hand in the other, draw the shoulders away from the ears and spread the shoulder blades. Lift the tailbone towards the sky, pressing the hips back and draw the heels towards the mat. Keep the core engaged and the ribs tucked and lift the kneecaps to engage the thighs.
5. Dolphin Chin Tucks
Now this is a fun one, a bit of a challenge! A great workout for the the shoulders and core, and it even works the legs as well! Basically all those areas you want to target in order to get upside down and into that headstand (and it’s also a great strengthener for other inversions, such as forearm stand).
How to: From Dolphin, lift off the heels and shift the weight forward, bringing the chin to touch either your hands or the mat in front of you. Make sure to keep the tailbone lifted and the bellybutton drawn in.
I figured this one deserved a little video for demonstration…
6. Headstand Prep
This is where those hamstring stretches really come in handy. The best way to lift up into a headstand is to get the hips nice and high, stacking them over the shoulders, this makes it so much easier to lift the legs off the mat because they simply don’t need to go as far.

How to: Keeping the elbows shoulder width apart, cupping one hand in the other (important because if you interlace your fingers you might end up hurting them if you were to fall). Lift the hips high and then walk the feet in close to the body, you essentially want to stack the hips over the shoulders.
7. Headstand Prep – Legs Lifting
If you can comfortably hold the first prep pose then you can start to experiment with lifting a leg off the mat.

How to: Press firmly into the shoulders and forearms to keep weight off the head and neck. Engage the core and try gently lifting one leg off, and if possible tucking it in towards the chest. If this feels comfortable then you can experiment with lifting off the other leg and bringing it in towards the chest. When both legs are lifted you can then lift the hips a bit more, tilting the tailbone to get yourself aligned for the full headstand.
8. Sirsasana A
And now, finally, the Headstand! If you’re all comfy cosy with both legs tucked, and yes I do actually want you to feel quite comfortable there before you start to extend the legs, then you can start to draw the legs up towards the sky coming into your full headstand.
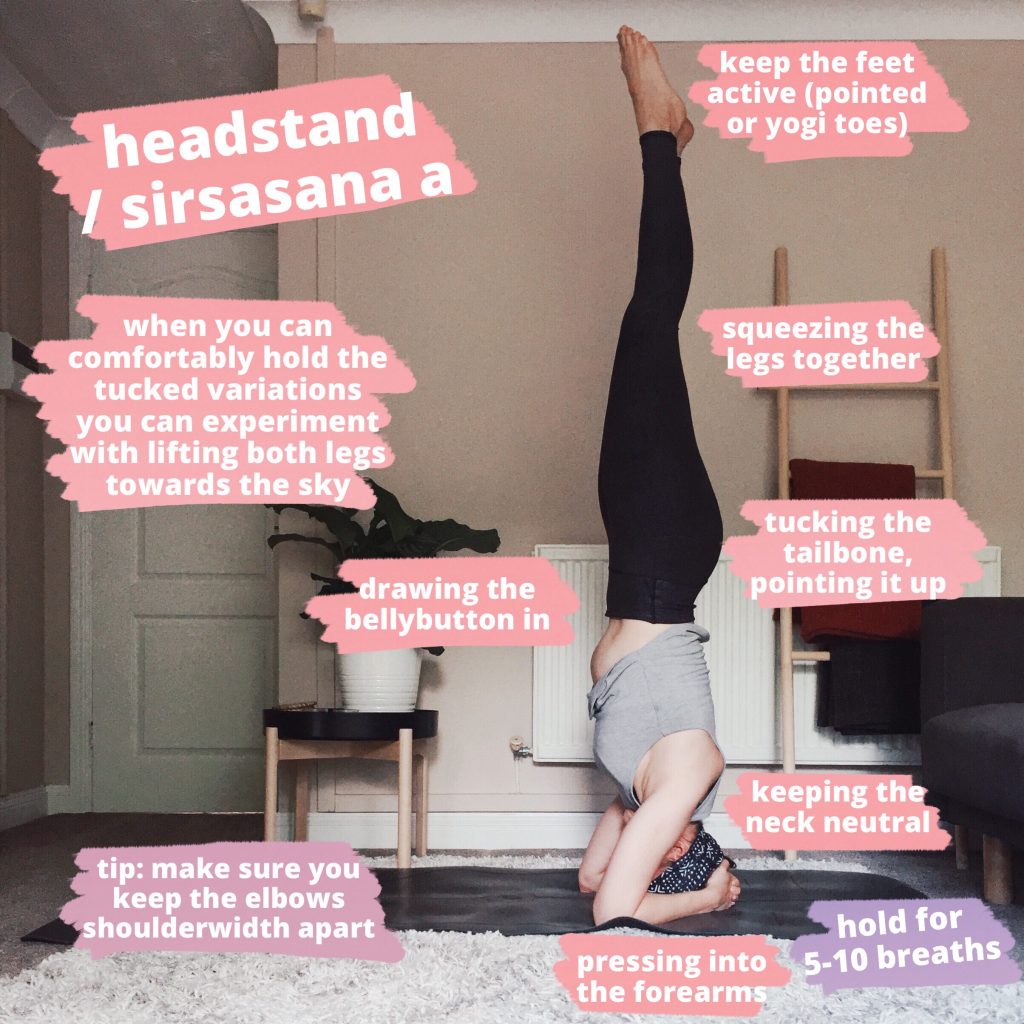
How to: Keeping the core engaged, press into the forearms and gently extend the legs up. When extended tuck the tailbone and squeeze the thighs together and engage the glutes. Make sure you’re also keeping the feet active, either pointing the toes or going with the half-flexed-toes-spread yogi toes.
Keep the engagement and hold for a few breaths. You made it!
When you’ve had enough, make sure you exit safely, going back down the same way you came up, drawing the knees into the chest and then gently lowering down. Once you get super comfy you can obviously get fancy with it and lower down with straight legs, but for now lets just keep it simple 😉
Once you’re down, take a few breaths in child’s pose before you continue your practice (don’t want you getting dizzy!)
Remember to also congratulate yourself on a good job, no matter how far you made it!
You can also find this tutorial and other fun stuff on my Instagram.
Until next time! Sx