Are you ready to push your practice? Of course you are! That’s why I’m starting this new series, Push Your Practice, where I plan on giving you the tools to build up the strength and the technique to access some of the more challenging asanas in yoga. Starting off with this crow tutorial!
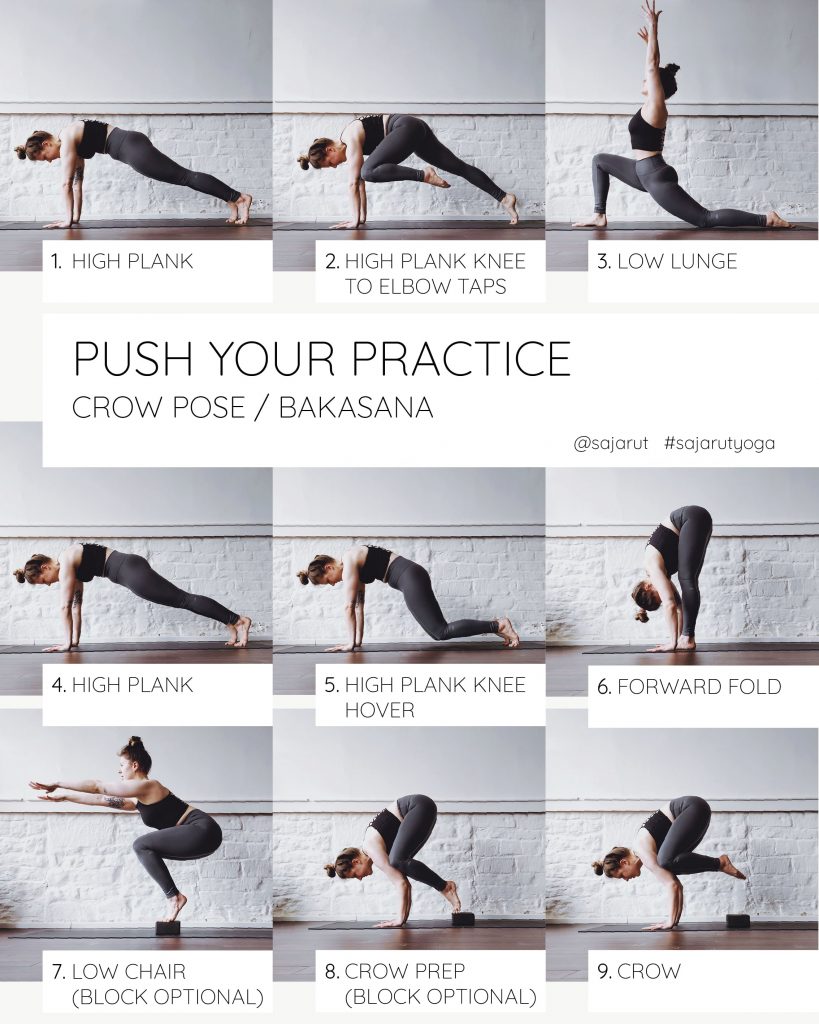
Crow, or Bakasana, is a great introductory arm balance that works the arms, shoulders, wrists, abdomen, inner thighs and hip flexors – yes it’s a real burner! It also builds up the strength and confidence to move onto more advanced arm balances over time. But let’s take it one step at a time shall we 🙂
Please make sure that you’ve warmed up first, including the wrists. Either include this crow tutorial flow in your own flow or do a few sun salutations before moving into it.
High Plank with Knee to Elbow Taps
Strong shoulders and a strong core are incredibly important for your crow pose so make sure you start by firing it up! Plank is definitely a classic for strengthening the core, add a slight rounding in your upper back and you really activate your shoulder stabilisers as well. Throw in some knee to elbow taps and you’ve got a real burner that also targets the hip flexors!
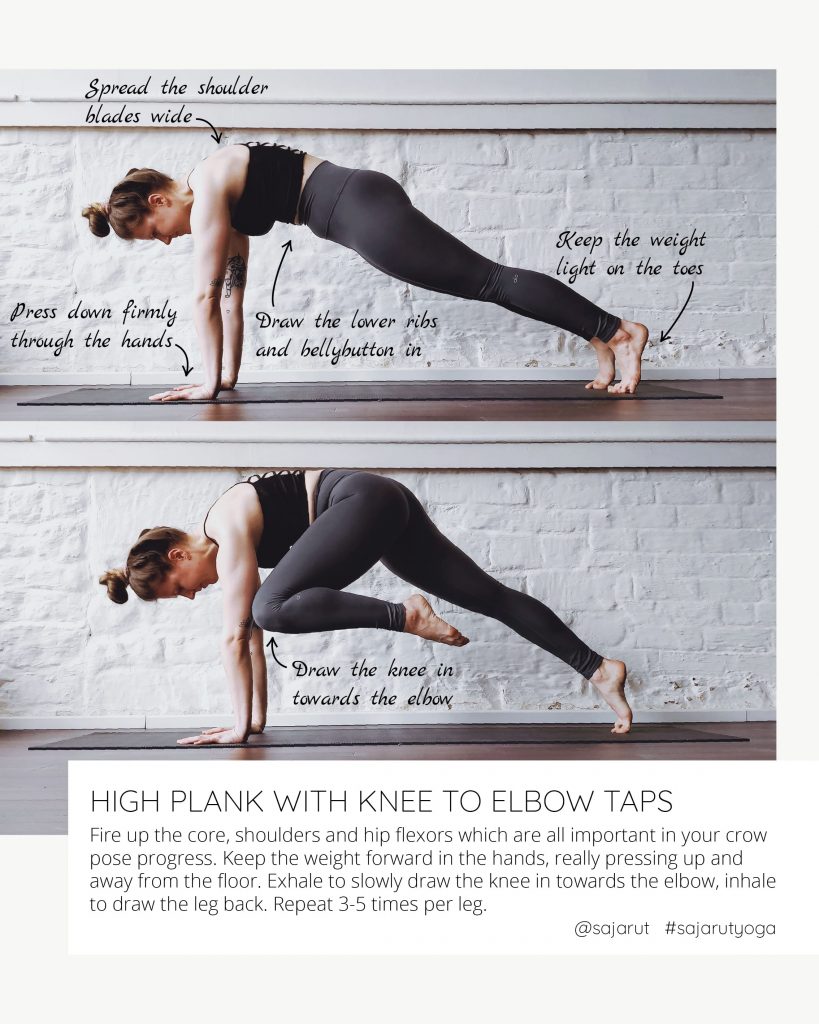
How to: Come into a high plank, with the hands firmly grounded and the weight primarily in the hands. Really press the ground away and find a little bit of lift in between the shoulder blades. Keeping the upper body strong and stable, inhale to hold then exhale to draw the knee in towards the elbow, tapping the knee just above it if possible. Inhale to draw the leg all the way back. Switching legs, exhale to draw the knee in. Repeat 3-5 times per leg.
Modifications: If you’re struggling to keep the upper body stable in a high plank then lower the knees to the mat – it’s better to lower the knees than to compromise on technique.
If the wrist feel sore then you can always lower down onto the forearms.
Low Lunge
Crow pose is a strong pose which not only works the upper body but also the hip flexors. By throwing a lunge into your preparations you both warm up and stretch out your hip flexors, preparing them for your crow pose.
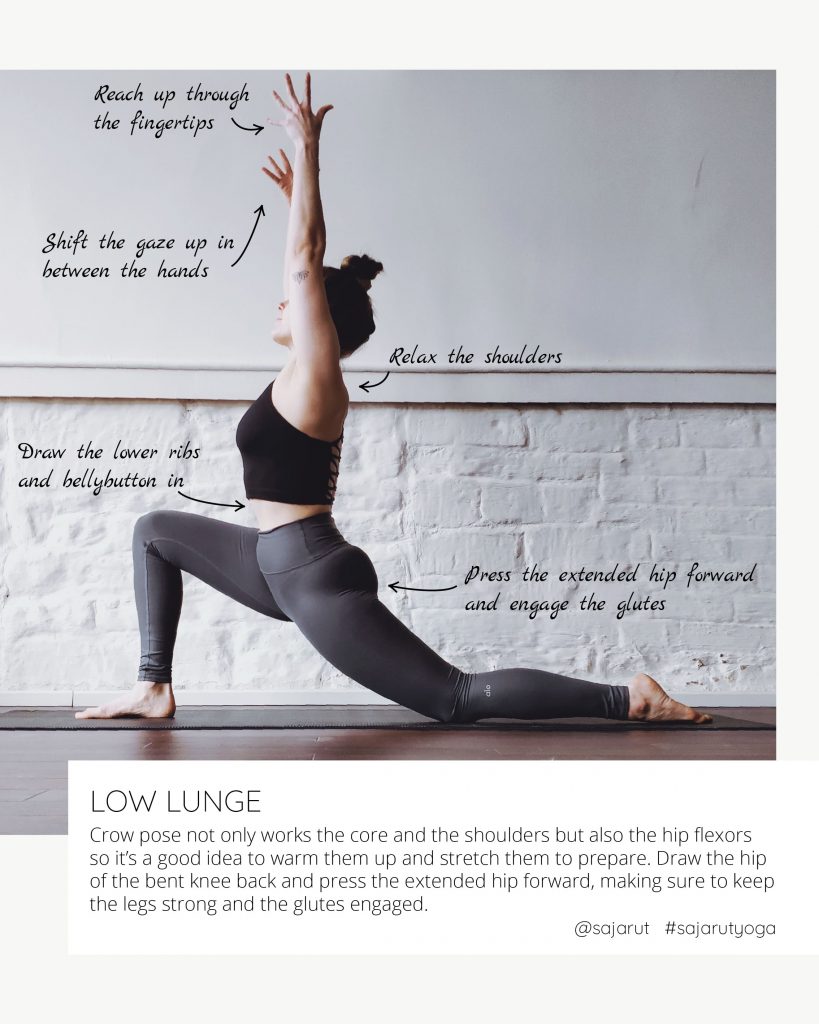
How to: From your plank step the right leg in between the hands and lower the back knee to the mat. Inhale to slowly reach the arms up into the air and exhale to hold. Keep the legs strong, gently pressing the extended hip forward to really stretch it out. Hold for 5 breaths before stepping back into your plank and switching legs.
High Plank with Knee Hover
Fire up the shoulders and core even further with a high plank with added knee hovers.
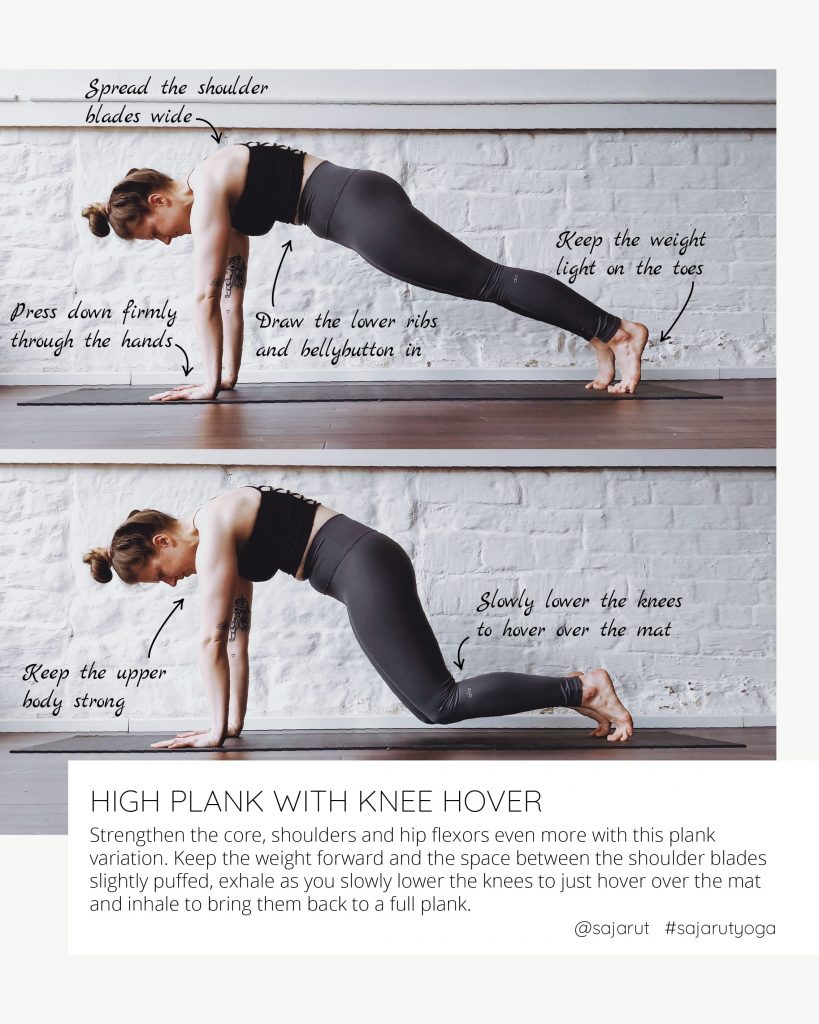
How to: Hold your strong plank, pressing up and away through the hands and keeping the weight forward. Inhale to hold, exhale to slowly lower the knees towards the mat, hovering them just above the mat. Inhale to slowly draw the knees back up to your full plank. Repeat 3 – 5 times.
Modifications: You can always do this on the forearms if the wrists are feeling sore.
Forward Fold
Get used to being up side down by taking a few breaths in your forward fold.
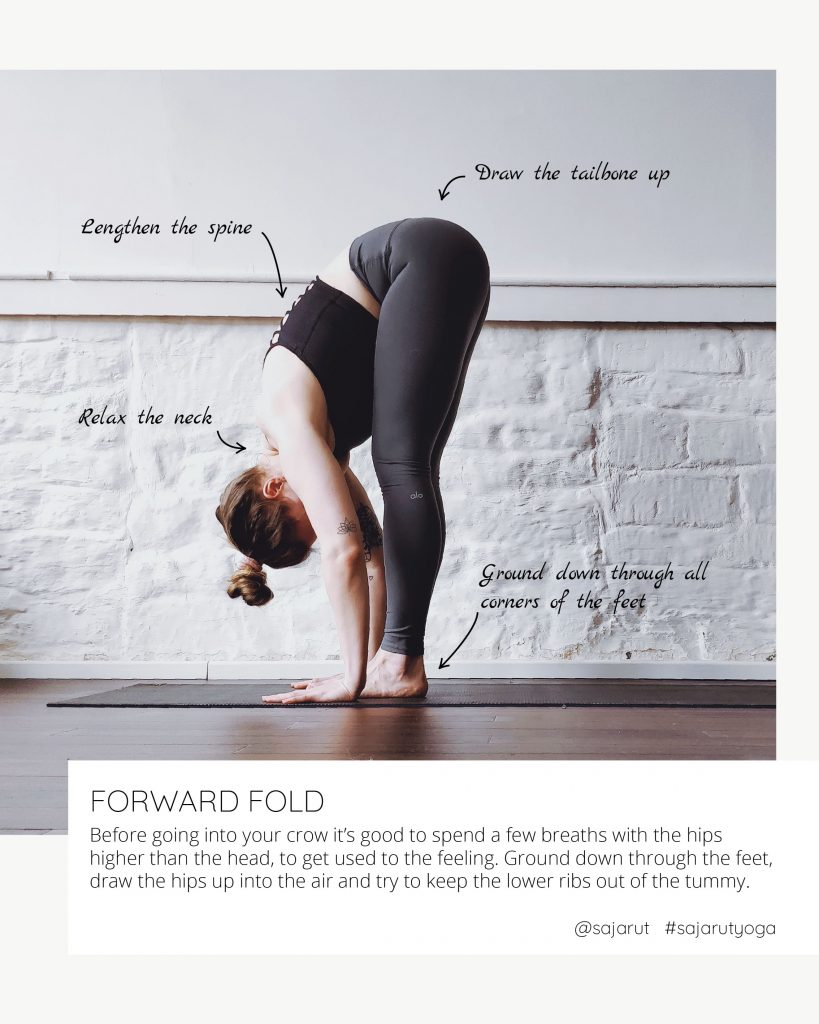
How to: Step the feet towards the front of the mat. Plant them fully, grounding down through the big toes, the little toes and the heels. Draw the hips up into the air, lengthen the spine but keep the neck relaxed. Stay for 5 breaths.
Low Chair
If you think about it, the shape of a low chair isn’t too different from a crow. It really activates the hip flexors and as long as you’re drawing the lower ribs in it really targets the core as well.
Standing on a block will not only challenge your balance but also allows you to lower straight down into your crow prep.
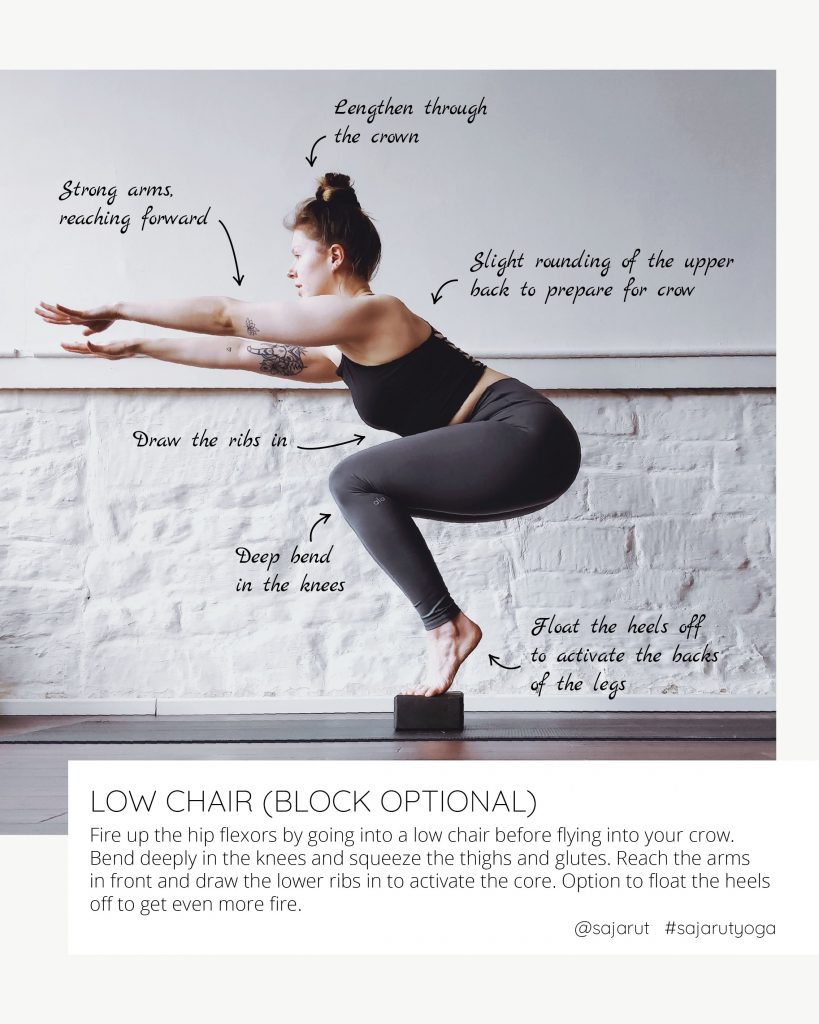
How to: From your forward fold, inhale to bend the knees and reach the arms up. Exhale to bend the knees even further, lowering the arms, reaching them far forward. Keep the legs strong and remember to also activate the glutes. Keep the lower ribs drawing in and to prepare for your crow have a slight rounding in the upper back. Hold for 5 breaths.
For even more fire – try lifting the heels off the mat or block.
Crow Prep to Crow
Last but not least, it wouldn’t exactly be a crow tutorial without a crow pose now would it!
There are various ways to come into your crow pose but my personal favourites are either lowering the hands to the mat straight from a low chair or bending the knees from a forward fold. Both options allow you to get the knees high up onto the triceps and keep the hips high, which are both important for a strong crow.
A block underneath the feet will also help you to get the hips higher and allow you to transfer the weight further into the hands.

How to: From your low chair, lower the hands to the mat, slightly in front. Bend the elbows and place the knees as high up onto the triceps as possible. Start to transfer the weight into the hands, drawing the hips up high. Keep the gaze forward and focus on really lifting up through the centre of the body, drawing the ribs in and spreading the shoulder blades wide. From there, maybe the feet slowly lift off the mat/block – try one at a time first.
Please don’t be discouraged if the feet don’t float off straight away. It takes time for the body to not only get used to the position but also to build up the strength to hold it. Just keep at it, I recommend including this crow tutorial in your flow twice a week and you’ll be flying in no time!
I hope you give this crow tutorial a try! Comment below if you do, or if you have any questions at all 🙂
Sign up to my newsletter to keep up to date with tutorials like this one. Also please come say hi over on IG.
Until next time! Sx

This is exactly what I’m looking for to prep for my crow pose! I’m able to lift a bit! As you said, I’ll keep practicing! Thank you for a great work in preparing for the tough poses!
Ah I’m so happy it’s helping! Let me know if you have any requests for other poses you want me to break down and create prep tutorials for 🙂 Sx